Hello, triangle!
As the name implies, this will be our "Hello, world!" of graphics programming. In WebGL, the most basic output is trough drawing a triangle and that will be our first job.
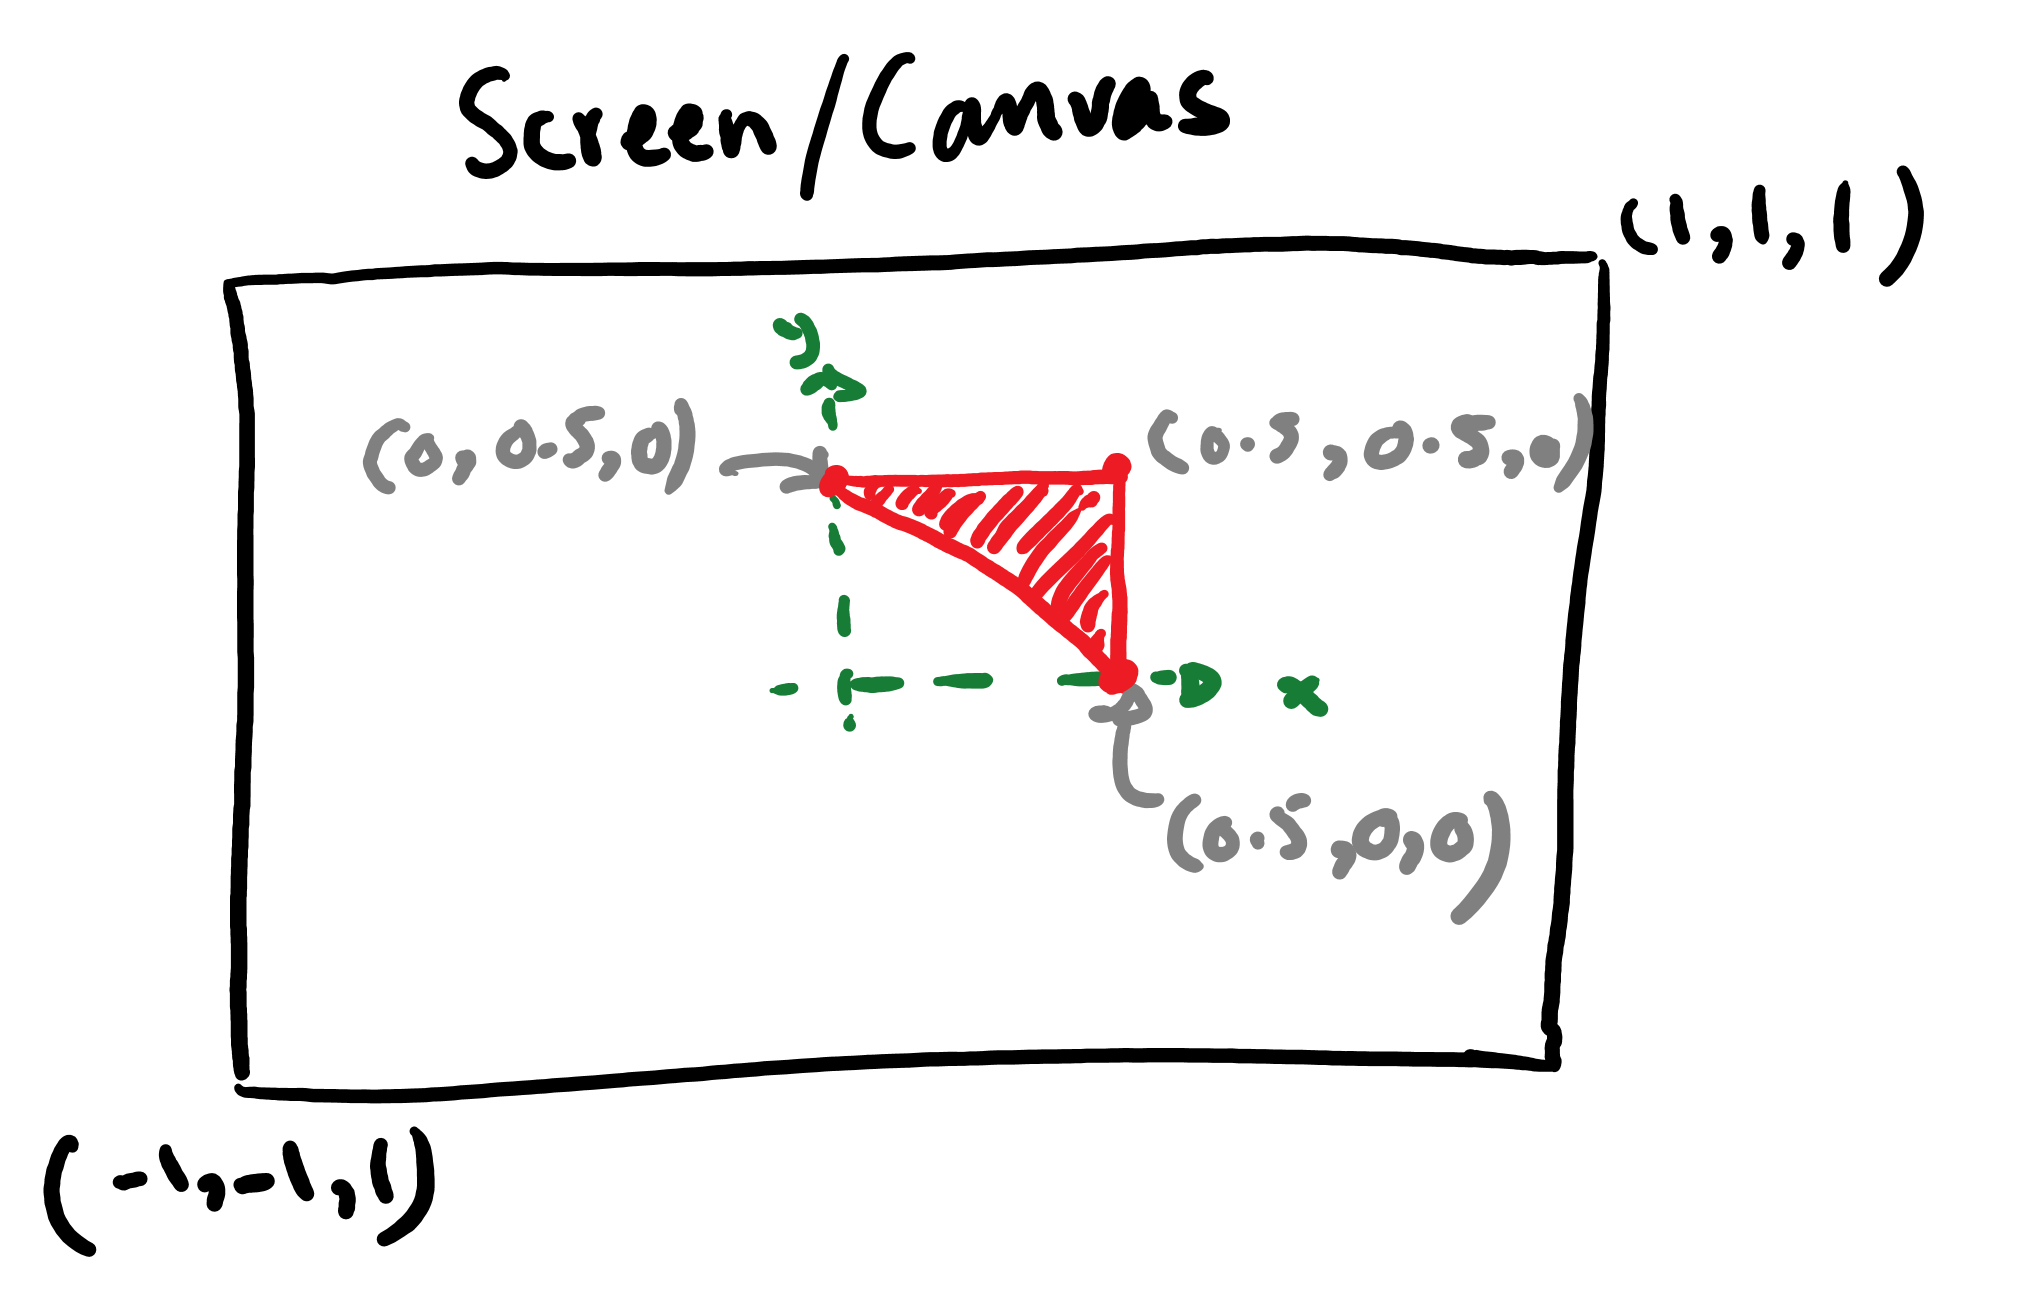
Our objective is to draw the following triangle as sketched and color it red.
Start with an HTML page
Create a blank HTML page
<!DOCTYPE html>
<html>
<!-- Head -->
<head>
</head>
<!-- body of the html page -->
<body>
</body>
</html>
Source Abubu.js library in your page
We should source the Abubu.js library in the <head> section by adding the following:
<script src='http://abubujs.org/libs/Abubu.latest.js'
	type='text/javascript'></script>
This will source/include the latest version of the library in our page. This all the installation work that you need to do for using the library.
For more details on the installation procedure, you can visit the installation guide.
Create a canvas for drawing
If we want to draw the triangle, we'll need a canvas to draw on. So, let's add a canvas with an id="canvas_1" attribute, to the <body> tag of our HTML page:
<canvas  id="canvas_1"
         width=512 height=512
         style="border:1px solid #000000;" >
   <!-- This message is displayed if canvas is not available -->
   Your browser does not support the HTML5 canvas tag.
</canvas>
This will create a canvas with the width and height of 512 pixels.
Let's start scripting
After our canvas is ready, we need to create a <script> tag so that we can start programming our application using JavaScript. Let's also get a handle to our canvas at the same time:
<script>
// Get the canvas --------------------------------------------------------
var canvas_1 = document.getElementById('canvas_1') ;
<script>
Setup the geometry
Abubu.js requires the geometry to be handed in as an object. So, let's set it up by adding the following lines to our <script> section:
// Setup geometry --------------------------------------------------------
var my_geometry = {
    vertices :  [
            0.5,    0.5,    0.,
            0.0,    0.5,    0.,
            0.5,    0.0,    0.,
        ] ,
    noVertices: 3 , // No of vertices
    noCoords  : 3 , // No of coordinates
    premitive : 'triangle_strip' ,
} ;
Write a vertex-shader and a fragment shader
The vertex shader and fragment shader source codes are handled as plain text as a single string variable. They are written in GLSL language. To be able to properly edit them and to have some minimal code highlighting, in the editor we place the code in <script> tags with the type attribute as shader, or vertex-shader or fragment-shader. This will trigger the HTML page to ignore the GLSL shader codes and not attempt to run them as JavaScript.
Let's add their source codes in separate tags. We start by the vertex shader:
<script id="vshader" type="shader">#version 300 es
precision highp float ; // high percision for float variables
precision highp int ;   // high percision for integer variables

in vec4 position;       /* position of vertices as input of
                           the shader */

// Main body of the vertex shader
void main() {
    /*  an identity map of the position of physical
        world coordinates to the rendered coordinate space */
    gl_Position = vec4(position.x,position.y,position.z,1.0);
}
</script>
It can be seen that the vertex shader has a simple structure to it. Most notably, we are only using a identity map which simplifies the shader's job.
Now, let's add the fragment shader:
<script id='fshader' type='shader'>#version 300 es
precision highp float ;
precision highp int ;

out vec4 outcolor ; /*  output of the shader
                        pixel color         */
// Main body of the shader
void main() {
    /* setting r,g,b,a values of the output color as an
       opaque red */
    outcolor = vec4(1.0,0.,0.,1.) ;
    return ;
}</script>
This shader is very simple: it only returns an opaque red color as output.
When the time comes to use the source code for these two shaders, we need to access the text value of these scripts. So, let's write a JavaScript function to read the source from these tags by passing just the id attribute of the scripts. This can be done by adding the following function definition to the main <script> tag.
// get the shader source by its id ~~~~~~~~~~~~~~~~~~~~~~~~~~~~~~~~~~~~~
function source(id){
    return document.getElementById(id).text ;
}
Define a solver using our setup
Now, we need to combine our geometry, vertex shader, and fragment shader to create a WebGL 2.0 application using Abubu.js. This will be also our first call to the library. This is accomplished by including the following code to the main <script> tag in our page:
var renderer = new Abubu.Solver( {
    vertexShader     : source('vshader'),
    fragmentShader   : source('fshader'),
    geometry         : my_geometry ,
    canvas           : canvas_1,
} ) ;
The code snippet above creates a WebGL 2.0 program that can render our geometry using the vertex and fragment shaders with the source codes in the <script> tags with the ids vshader and fshader, respectively. When you render this WebGL 2.0 program which we call a solver. When the solver is rendered, the result is displayed on the canvas_1 canvas element.
Once we have defined out program, we should run it. So, let's add the final line to the <script> tag:
renderer.render() ;
In the end, our HTML page code code should look like this:
<!DOCTYPE html>
<html>
<!-- Head -->
<head>
<script src='http://abubujs.org/libs/Abubu.latest.js'
	type='text/javascript'></script>
</head>
<!-- body of the html page -->
<body>
    <canvas id="canvas_1"
            width=512 height=512
            style="border:1px solid #000000;" >
        <!-- This message is displayed if canvas is not available -->
        Your browser does not support the HTML5 canvas tag.
    </canvas>
</body>

<!--&&&&&&&&&&&&&&&&&&&&&&&&&&&&&&&&&&&&&&&&&&&&&&&&&&&&&&&&&&&&&&&&&&-->
<!-- vertex shader -->
<!--&&&&&&&&&&&&&&&&&&&&&&&&&&&&&&&&&&&&&&&&&&&&&&&&&&&&&&&&&&&&&&&&&&-->
<script id="vshader" type="shader">#version 300 es
precision highp float ; // high percision for float variables
precision highp int ;   // high percision for integer variables

in vec4 position;       // position of vertices as input of the shader

// Main body of the vertex shader
void main() {
    /*  an identity map of the position of physical
        world coordinates to the rendered coordinate space */
    gl_Position = vec4(position.x,position.y,position.z,1.0);
}
</script>

<!--&&&&&&&&&&&&&&&&&&&&&&&&&&&&&&&&&&&&&&&&&&&&&&&&&&&&&&&&&&&&&&&&&&-->
<!-- fragment shader                                                  -->
<!--&&&&&&&&&&&&&&&&&&&&&&&&&&&&&&&&&&&&&&&&&&&&&&&&&&&&&&&&&&&&&&&&&&-->
<script id='fshader' type='shader'>#version 300 es
precision highp float ;
precision highp int ;

out vec4 outcolor ; /*  output of the shader
                        pixel color         */
// Main body of the shader
void main() {
    /* setting r,g,b,a values of the output color as an
       opaque red */
    outcolor = vec4(1.0,0.,0.,1.) ;
    return ;
}</script>

<!--&&&&&&&&&&&&&&&&&&&&&&&&&&&&&&&&&&&&&&&&&&&&&&&&&&&&&&&&&&&&&&&&&&-->
<!-- Main script -->
<!--&&&&&&&&&&&&&&&&&&&&&&&&&&&&&&&&&&&&&&&&&&&&&&&&&&&&&&&&&&&&&&&&&&-->
<script>
// get the shader source by its id ~~~~~~~~~~~~~~~~~~~~~~~~~~~~~~~~~~~~~
function source(id){
    return document.getElementById(id).text ;
}

// Get the canvas ------------------------------------------------------
var canvas_1 = document.getElementById('canvas_1') ;

// Setup geometry ------------------------------------------------------
var my_geometry = {
    vertices :  [
            0.5,    0.5,    0.,
            0.0,    0.5,    0.,
            0.5,    0.0,    0.,
        ] ,
    noVertices: 3 , // No of vertices
    noCoords  : 3 , // No of coordinates
    premitive : 'triangle_strip' ,
} ;
// Setup a solver ------------------------------------------------------
var renderer = new Abubu.Solver( {
    vertexShader    : source('vshader'),
    fragmentShader  : source('fshader'),
    geometry        : my_geometry ,
    canvas          : canvas_1,
} ) ;

// rendering (running) the solver
renderer.render() ;
</script>
</html>
If you open the HTML page in a Google Chrome or Mozilla FireFox browser, you should see this:

Congratulations! You successfully created your first WebGL 2.0 program using Abubu.js!